Battery relocation to trunk
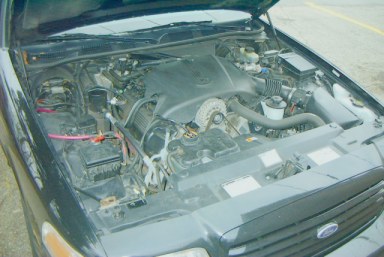
Please stop asking me why I put my battery in the trunk. I don't have a good reason, although the engine compartment looks cleaner and I don't seem to chirp the tires at stoplights as much (added weight over RR tire). However I will say that this is an affordable way to make your car a little different.
Below is the installation procedure, this was done on a 1999 Crown Vic LX without premium sound (no amp in the trunk). A project cost breakdown is at the bottom of the page.
Parts needed: (the ones I used, anyway) - Summit Racing's SUM-G1200A battery relocation kit 
- You may need a new battery, the Motorcraft unit is too big for Summit's box and is larger than most aftermarket batteries anyway. - Battery cable termination parts (what I used is listed in the cost breakdown below) - Grounding strap for engine-to-frame (TAY-148014) - Wire loom and nylon zip ties Tools needed: - No special tools required. Drill & drill bits, screwdrivers, socket set, pliers... If you are only slightly interested in taking on this project, may I humbly suggest reading the following in its entirety before "taking the plunge." There are some kinks along the way that you might not want to deal with. Step 1: PlanningLet me begin by suggesting how to finish this project: Don't unhook your original battery until you are at the very end of the project. This is especially important if, like me, you are spreading the project out over a number of days and need to drive the car while undertaking the project.Also it is important to emphasize the consequences of a poor installation. Poor planning or poor execution of a good plan may result in your positive wire somehow reaching ground. This will not only cause the engine to die, perhaps at an inconvenient or dangerous time, but for all I know it could cause your battery to explode, which may result in fire if there is a spark near the gases from battery acid.
Before you reach the point of no return, make sure the battery you intend to mount in the trunk is fully charged!! If you modify the underhood battery cable ends, and your replacement battery is discharged, you may be caught scratching your head on how to start the car.
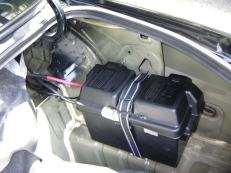
Step 2: Battery box mountingUnhappy with the location I previously had, I decided to move the box down to the passenger-side shelf. The strap seemed to hold it in place really well so I didn't use the pain-in-the-neck J-bolts that were supplied with the kit. Once you are satisfied with the mounting of the battery box, remove the box and proceed with the wire routing.
Step 3: Wire routing
I'll say this so no one sues me: Do not route live cables. Unhook all batteries before routing your wires.
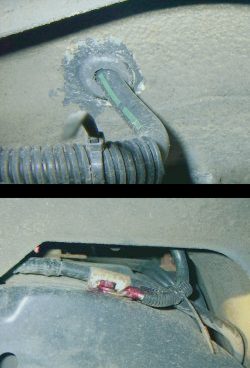
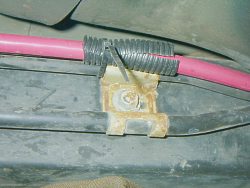
With that out of the way, start with routing the ground wire. All it has to do is go through the floor and get bolted to the frame of the vehicle. Use a grommet (supplied in the Summit kit) whenever a cable goes through sheet metal. I ran my ground wire right through the trunk floor and bolted it to the frame at an existing fuel line bracket hole (see pic at right). It is probably a good idea to grind off rust and paint at contact areas, to ensure a reliable ground connection.
Next, plan how to run your 2ga positive battery cable from the trunk to under the hood. To make things a little easier, I ran my cable from the trunk to under the back seat, and then went through the floor underneath the back seat (see pic).
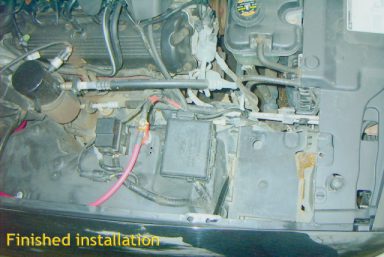
Coming up through the underhood, the cable takes a turn towards the fenderwell while the fuel lines veer towards the center of the engine. It is surrounded by plastic at this point so I did not use wire loom.
Step 4: Positive cable termination
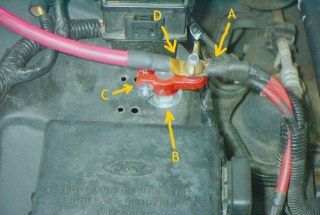
Only when you are sure of your design should you unhook your existing battery, especially if you mimic my design, where I modified the factory cable ends so that they will no longer quickly bolt to the factory battery. My terminal end is displayed in the picture at right, here is a guide to the individual components: You don't really need parts B & C, they don't flow any electrons, but I like the way it looks and it secures the cable end from flopping around the engine compartment.
Step 5: Engine grounding
This is another "comfort cushion" item, the engine would probably get grounded just by bolting the old battery cable to the vehicle frame, but it is an inexpensive way to make sure the electrical system maintains ground at all times.
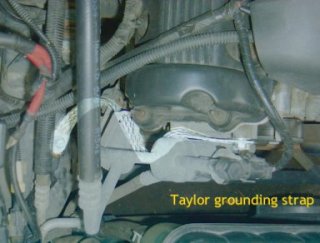
In the pic at right, the Taylor ground strap from Summit is highlighted. It is bolted to the engine front cover in an existing tapped bolt hole. In pre-1998 vehicles, this is where the coil pack is located. The other end is bolted--with a self-tapping hex-head bolt--to an existing frame hole, along with the cable end that used to bolt to the battery. Instead of modifying the cable end (see positive cable termination) I just cut the end off and crimped a copper 4ga cable end onto it for easy fastening to the frame.
Step 6: Fín!First go back and check to make sure everything is safe and secure. Grounds are grounded, the positive cable never touches the frame or body, and there are no fuel tank ruptures.
Carefully hook up the new battery and check again. Important: Never stand over a battery when you are hooking it up. If everything appears in order, start the engine. If everything is fine, shut off the engine, secure the battery in the box and go on your merry way!
[email protected]
|
Pictures Repairs & Mods Improvements FAQ VIN Decoder Door Sticker Decoder Models & Options Model Year Changes |
 For a clean installation your wires should come through the floor right at the battery box. Familiarize yourself with the underside of your car, paying special attention to the fuel tank that is mounted behind the rear axle.
 From there I used wire loom and zip ties to secure the cable to the existing fuel lines running inside the frame. The wire loom is very important because it protects the soft cable insulation from being cut by the vibrating metal pieces it may come in contact with.
 I know it's getting repetitive, but design your positive cable terminal in such a way that there is no possibility of reaching ground. Think about how you would get/give a jumpstart, is your jumper cable jaw going to touch any ground while it is attached to the positive terminal?
;)