On June 5, 2004, I finally found the time to install all my new brake parts. It was certainly my most ambitious project on the Crown Vic so far. It was also the most rewarding!
Jump to Table of Contents

Parts I installed:
|
P/N |
Price |
Notes |
| Command Automotive brake rotors |
SD-1 |
~$347 for a complete set |
Note CVN on order |
| Performance Friction brake pads |
7484 (front)
6744 (rear) |
~$90 at AutoZone |
steel pistons |
| Kenny Brown stainless flex lines |
KBP-70228DOTF |
~$100 for fronts only |
 |
| Russell Performance speed bleeders |
639590
(3/8-24 x 1") |
$9.88 x 2 at Summit Racing |
 |
Tools I used:
• Wheel removal tools (1/2" breaker bar w/ 13/16" socket)
• 1/4" and 3/8" ratchet and socket set (metric and standard)
• 2 ton jack and jackstands (would have preferred heavier jack)
• Drill and 1/4" drill bit (to remove rivets)
• 4" C-clamp and small block of wood
• BFH (big f'ing hammer--I have a 4lb dead-blow hammer)
• Mechanix gloves
• Drip pan
• Standard screwdriver
• Wire brush
• 18" length of flexible hose, ~3/16" ID
Materials I used:
• PB Blaster (1 can, ~$3)
• Brake cleaner (1 can, ~$3)
• Brake fluid (DOT 3/4) (at least 1qt)
• Caliper pin grease (little squeeze tube, ~$1)
• Disc brake quiet (9oz can, ~$4)
• Anti-seize compound (squeeze tube)
• VHT Brake Component spray paint (~$8/can at AutoZone)
Time it took (including lunch and time to take pics):
• about 8 hours
The following is a documentation of the procedure I followed. It might not be the preferred method, so if any experts wish to point out any discrepancies or mistakes, PLEASE send me a message--email at bottom of page. The author claims no responsibility for damage blah blah blah blah. All pics on this page will open in a new window.
Table of Contents:
1 - Preparation
2 - Rear Brake Disassembly
3 - Rear Brake Installation
4 - Front Brake Disassembly
5 - Front Brake Installation
Top of page
Preparation
1.1. A day before starting work, spray PB Blaster on all the bolts you will be removing or loosening. Read through this procedure to find out which bolts are included.
1.2. Park on a flat, level, solid surface. Ensure that there is room on both sides to sit down and do the work. Obviously a lift would be ideal for this. HPP owners, turn off the air suspension switch in the trunk. Chock the front wheels. Put the car in Neutral.
1.3. Loosen all the lugnuts, just enough to "break them loose". When the tires aren't touching the ground, this task would be nearly impossible without a impact wrench.
Rear Brake Disassembly
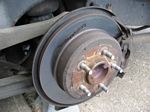
2.1. Jack up the rear axle and place jackstands on the axle tubes just outboard of the shock mount. When jacking, make sure the jack "cup" is on the bottom of the differential--not touching the differential cover. The car only needs to be high enough to get the wheels off.
2.2. Remove the wheels and inspect the brake assembly. Give critical bolts another spray of PB Blaster. Don't forget to spray the ABS sensor.
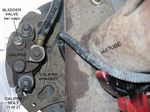
2.3. Unscrew the cap on the master cylinder brake reservoir (under the hood). Place the drip pan under the caliper. Remove the dust cap from the bleeder valve and remove the valve with a 3/8" socket. It will drip fluid as you do this. Install the speed bleeder all the way, then back it off 1/4 to 1/2 turn to open the valve, as directed in the speed bleeder instructions.
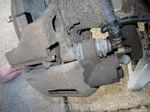
| 2.4. Remove the caliper bolts with a 10mm socket. Slide the caliper off the rotor. It may be difficult to get a grip on the caliper, so some slight encouraging with a screwdriver can be helpful. Note that the caliper must pivot due to a clip attached to the top of the outboard brake pad. Rest the caliper on something, or hang it from the frame with a length of wire. Do not let the caliper hang by the brake line, this can damage the line and cause leaks.
|    |
2.5. Remove the outboard brake pad from the caliper. It is held on with clips and locating pins.  Squeeze the pad towards the piston to release the pins and allow the pad to be removed. I sprayed PB Blaster on the clips, but I don't know how much this helped.
2.6. Remove the inboard brake pad from the piston. It is clipped onto the inside of the piston, so you should be able to just pull it away from the piston.
| 2.7. Try to pull the rotor off. It should be loose, but it will probably get caught on the parking brake pad (which rides inside the "top hat" of the rotor). If it is not loose, whack at it with the hammer until it becomes loose. The parking brake ridge may be keeping the rotor from coming off, but you should still be able to wiggle the rotor around. To get past the parking brake ridge, use a screwdriver to remove the dust cover and expose the parking brake adjuster screw. Then locate the actual adjuster (~1/2" diameter, star-shaped nut) and use the screwdriver to spin the adjuster away from you. It will make a squeaky groaning sound as it spins. Spin the adjuster a little bit and then test if the rotor will come off. Repeat until the rotor can be pulled off without a fight, trying to remember how many turns it required. The bottom pic at right shows the adjuster with the rotor off. |  
|
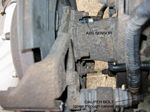
 2.8. With the rotor off, spray some more PB Blaster onto the ABS sensor, this time on the outboard side now that it is accessible (see bottom pic in Step 11). Remove the ABS sensor by removing the 10mm bolt and working the sensor out of its hole. The sensor may be rusted to the car, so some persuasion might be necessary. The sensor housing is pretty durable. Once removed, clean the sensor with brake cleaner. Apply a thin coat of anti-seize to the sensor mounting surfaces on the car (the hole and the flat spot where the bolt goes into), then re-install the sensor.
 2.9. Clean up the brake assembly: Clean off the hub and apply a thin coat of anti-seize on the rotor mounting surface.
This is also an opportune time to paint the caliper and caliper mounting bracket. Follow the directions on the can for surface preparation. I wasn't super-careful about overspray, I just used the black wheel housing as a backdrop. I probably would have been more careful on a white car, or if I were painting the calipers bright yellow.
Rear Brake Installation
| 3.1. Clean the new rotor with brake cleaner and install it on the hub. Since everything is fresh and clean, the rotor may want to slide back off or sit crooked. Just use a lugnut to hold the rotor on (finger-tight). New and old rotor comparison pics can be seen at right. |   |
 3.2. Compress the piston all the way into the caliper. Be sure the cap is off the underhood brake reservoir, and the bleeder valve is open and is ready to squirt into the drip pan. Use a C-clamp and a block of wood to slowly press the piston down. The bleeder valve can be closed and excess fluid can be cleaned up when the piston is compressed.
 3.3. Clean the surfaces where the pads will contact the caliper. Use a wire brush followed by brake cleaner. Then apply Disc Brake Quiet to the backs of the pads, where they will be contacting the caliper. These general areas are circled in blue, in the picture at right. Let the Disc Brake Quiet dry a little, as directed on the can. The spray will become sticky and prevent the pads from "floating" and creating noise later.
3.4. Install the brake pads to the caliper. Start with the inboard (piston side) pad, carefully align the spring clamp "fingers" into the piston and press the pad into the piston until it clicks. Then install the outboard pad, making sure the alignment pins are located correctly.
| 3.5. Lubricate the moving parts of the caliper with disc brake grease. This includes the caliper slides (peel back the rubber boot just enough to squeeze fluid inside) and the sleeves on the caliper bracket (pic at right). Clean any excess lubricant off the rotor. |  |
3.6. Reinstall the caliper to the mounting bracket. Remember that there is an upper clip on the outboard brake pad that requires the top to go in first. You may need to move the caliper slides inboard so that they get past the mounting bracket. Some wiggling may be required to get the bolts lined up with their holes.
 3.7. Re-adjust the parking brake to its original position by turning the screw back towards yourself. I honestly don't know how to tell when it is adjusted correctly... if you know, please send an email to the address at the bottom of this page.
3.8. Bleed the brake line. Open the bleeder valve, then attach a piece of hose to the nipple and feed it into the drip pan or catch container. Top off the brake fluid in the underhood reservoir, then pump the brake pedal up to ten times. Top off the fluid and pump the pedal ten more times. Repeat this process again if the fluid coming out of the bleeder is still murky. Tighten up the bleeder valve and install the dust cap.
3.9. Remove the temporary lugnut from the rotor. Apply a thin coat of anti-seize to the wheel mounting surface on either the rotor or the wheel. Re-install the wheel.
Front Brake Disassembly
4.1. Using the lower shock mount as a jacking point, lift the vehicle enough to place a jack stand under the frame behind the front tire.
4.2. Remove the wheels and inspect the brake assembly. Give critical bolts another spray of PB Blaster. Don't forget to spray the ABS sensor.


4.3. Unscrew the cap on the master cylinder brake reservoir (under the hood). Place the drip pan under the caliper. Remove the dust cap from the bleeder valve and remove the valve with a 3/8" socket. It will drip fluid as you do this. Install the speed bleeder all the way, then back it off 1/4 to 1/2 turn to open the valve, as directed in the speed bleeder instructions.
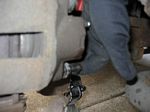
| 4.4. At this point I decided to install the new brake lines. Note that the longer of the two lines is designed for the passenger side. The directions supplied by Kenny Brown are very good, I just followed those. I did have to modify the mounting bracket so that it would sit flat against the frame rail. The angle shown in the pic at right is actually a little too far, so I had to do some manhandling of the factory hard line to keep it from interfering with the bracket mounting bolt. Such is aftermarket!! Anyway I think the hard line bolt and the bracket mounting bolt were both 13mm, and the caliper side bolt was 1/2". Be sure the drip pan is underneath the hard line, as it will continue dripping until it is secured to the new flex line. |    |
 4.5. Remove the caliper bolts with a 1/2" socket. Slide the caliper off the rotor. It may be difficult to get a grip on the caliper, so some slight encouraging with a screwdriver can be helpful. The brake pads will stay with the caliper mounting bracket, this is OK. Rest the caliper on something, or hang it from the frame with a length of wire. Do not let the caliper hang by the brake line, this can damage the line and cause leaks.
| 4.6. Remove the brake pads from the mounting bracket. |  |
4.7. Remove the caliper mounting bracket. There are two 17mm (or 18mm? sorry) bolts that connect the bracket to the spindle. They are on very tight. I improvised an impact wrench by tapping my 3/8" ratchet with my dead blow hammer, but the guys at crownvic.net say that it is easier to just turn the steering wheel  to make the bolts accessible by breaker bar. I didn't want to go turning the wheel when the car is only supported by one jackstand, so that was out. Once the bolts are removed, the caliper bracket can be set aside (and painted, if you so desire--I also painted the caliper at this point).
 4.8. Drill out the two factory rivets that are holding the rotor to the hub. I used a 1/4" drill bit and just drilled the whole rivet out. An alternative is to drill out the "head" of the rivet and then use a punch to hammer out the rest. Some hammering may be required if the rotor is still sticking to the hub after removing the rivets.
 4.9. With the rotor off, spray some more PB Blaster onto the ABS sensor, this time on the outboard side now that it is accessible. Remove the ABS sensor by removing the 10mm bolt and working the sensor out of its hole. The sensor may be rusted to the car, so some persuasion might be necessary. I found a neat little spot to stick my screwdriver, to try and get under the sensor and pry it out. The sensor housing is pretty durable. Once removed, clean the sensor with brake cleaner. Apply a thin coat of anti-seize to the sensor mounting surfaces on the car (the hole and the flat spot where the bolt goes into), then re-install the sensor.
4.10. Clean up the brake assembly, as detailed in step 2.9.
Front Brake Installation
| 5.1. Clean the new rotor with brake cleaner and install it on the hub. Use a lugnut to hold the rotor on (finger-tight). New and old rotor comparison pics can be seen at right. |   |
5.2. Reinstall the caliper mounting bracket.
 5.3. Compress the pistons all the way into the caliper. Be sure the cap is off the underhood brake reservoir, and the bleeder valve is open and is ready to squirt into the drip pan (you may want to attach a drain tube to the valve). Use a C-clamp and a block of wood to slowly press the pistons down. The bleeder valve can be closed and excess fluid can be cleaned up when the pistons are compressed.
| 5.4. Lubricate the moving parts of the caliper mounting bracket with disc brake grease. This includes the caliper slides (peel back the rubber boot just enough to squeeze fluid inside) and the sleeves on the caliper bracket (pic at right). Clean any excess lubricant off the rotor. |   |
 5.5. Clean the surfaces where the pads will contact the caliper. Use a wire brush followed by brake cleaner. Then apply Disc Brake Quiet to the backs of the pads, where they will be contacting the caliper. These general areas are circled in blue, in the picture at right. Let the Disc Brake Quiet dry a little, as directed on the can. The spray will become sticky and prevent the pads from "floating" and creating noise later.
5.6. Install the brake pads to the caliper mounting bracket, making sure they lie flat against the rotor.
5.7. Reinstall the caliper to the mounting bracket. I found it easiest to approximately line up the three outboard "teeth" of the caliper with the brake pad, then pivot the caliper down over the inboard brake pad and caliper slides. You may need to squeeze the caliper slides so that the caliper will fit over them. Some wiggling may be required to get the bolts lined up with their holes.
 5.8. Bleed the brake line. Open the bleeder valve, then attach a piece of hose to the nipple and feed it into the drip pan or catch container. Top off the brake fluid in the underhood reservoir, then pump the brake pedal up to ten times. Top off the fluid and pump the pedal ten more times. Repeat this process again if the fluid coming out of the bleeder is still murky. Tighten up the bleeder valve and install the dust cap.
5.9. Remove the temporary lugnut from the rotor. Apply a thin coat of anti-seize to the wheel mounting surface on either the rotor or the wheel. Re-install the wheel.
5.10. Refill the brake reservoir to the MAX line and replace the cap.
June 5, 2004
[email protected]
(remove nospam from the address)
Top of Page
Click to go Home
;)
;)
;)
;)
;)
;)
;)
;)
;)
;)
;)
;)
;)
;)
;)
;)
;)
;)
;)
;)
;)
;)
;)
;)
;)
;)
;)
;)
;)
;)
;)
;)
;)
;)
;)
;)
;)
;)