When the weather gets warm, the question is often asked on thirdgen f-body (1982-1992 chevrolet camaro and pontiac firebird) related discussion groups how to retrofit power windows into a car that currently has manual crank windows.
There appears to be a large amount of confusion about what is different
between a thirdgen that has factory power windows and a thirdgen that
has factory crank windows. The only part inside the door that is different
is the regulator itself and the wiring to the regulator. The door shell
is predrilled for both manual regulators and power regulators. Many people
have suggested replacing the entire "manual" door with a used wrecking
yard "power" one to add power windows to a car, this solution will work but
you'll also end up with mismatched body panel paint colors and have the
task of reattaching the hinges and realigning the door.
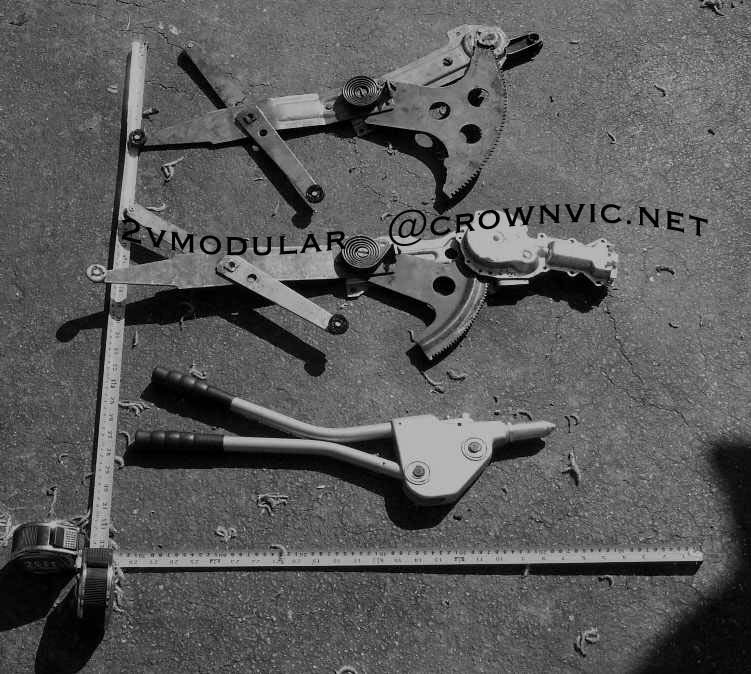
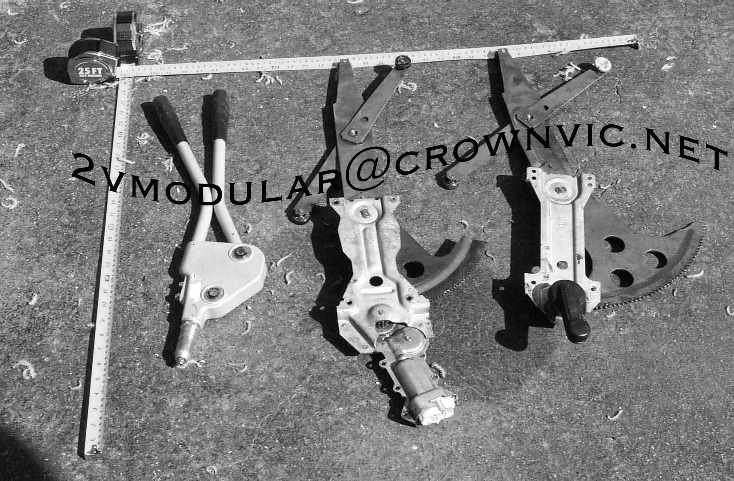
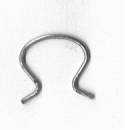
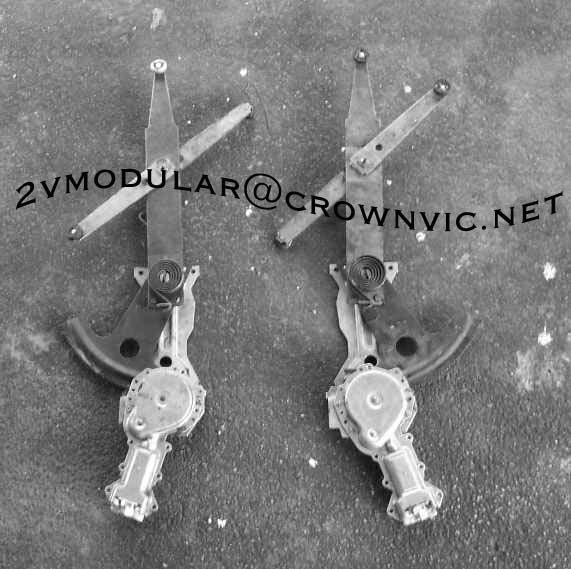
Above is pictured a manual crank regulator next to a power window regulator, the other device is a large rivet gun. If changing the window motor prior to installation, drill a hole in the sector gear and install a temporary bolt to secure the gear in place. The large counterweight spring can have a significant amount of tension behind it.
Overview of Procedure:
To add original equipment (OE) power windows to a thirdgen f-body that currently has manual crank windows, one has to:
At a quick glance, the steps mentioned above may look simple and appear
that they could be completed in a couple hours. But for someone that has
not done this project before, allow yourself a weekend or two for this
project.
Is probably a good idea to get the wiring in place first, then later cut the console for the switches and finally install the regulators themselves. This way you can take a break from working on the project and still have functional windows. It does no harm to the car to have the power window wiring inside the door and under the center console as long as the connectors do not accidentally short to ground. Just cover the unused plugs with electrical tape and this will not be a concern. By contrast if one had swapped the power regulators into the door first, one would not be able to move the windows until all the wiring was in place and connected.
Tools and Parts (Supplies) Required:
hammer
punch
1/2" ratchet and sockets
1/4" ratchet and sockets
set of torx (star shaped) drivers
something to cut rectangular holes in the center console with:
dremel and a set of files (probably the quickest)
electric drill and a set of files (takes longer than using a dremel,
but the end result will be the same)
electric grinding wheel (optional for grinding regulator rivet heads)
electric drill
drill bits (for drilling out regulator rivets)
2 power window switches (New switches have a suggested retail of less
than $15/each at the dealer, and you will probably break the old ones trying
to remove them from your donor vehicle. Both passenger and driver side
window switches have the same part number and interchange. All 82-92 camaros
and firebirds use power window switches with the same physical dimensions
and electrical connectors. Although the switches are interchangable between
years, there are some subtle cosmetic differences between them.
2 power window regulators
2 power window motors
(Any 1982-1992 chevrolet camaro or pontiac firebird regulator will
be a suitable donor for your regulator swap. But if you want new parts,
www.electric-life.com makes a complete kit that will include an instruction
manual, new regulators, new motors, switches and a complete electrical
harness. might also check http://www.a1electric.com as they have a good
selection of electric-life kits)
can of white lithium grease (to grease window tracks and other door internals)
duct tape (to repair torn door weather barrier)
door panel friction clips (to replace the friction clips that will
break when the door panel is removed)
Can grab the entire power window harness out of a donor car, or can construct
your own using
14 guage stranded wire
2 electrical connectors for power window switches (Note: f-bodies
use a unique window switch connector, that is not shared with any other
vehicles)
2 electrical connectors for power window motors (Common connector,
should be present on most any RWD 1980's general motors product. Window
motor connector is the same as the power lock motor connector.)
solder & soldering iron
heatshrink tubing
electrical tape
Are two choices for retaining the window regulators to the door shell:
can use 8 1/4" "peel" rivets and a large 1/4" rivet gun
or instead can use 8 1/4" bolts, nuts, and washers
(note: nuts & bolts can work themselves loose over time)
if the doors do not currently have any power features such as locks or mirrors, you will also need the rubber boot that connects the door to the body of the car.
Suppliers:
HarborFreight http://www.harborfreight.com
The large rivet gun shown in pictures above is from harborfreight.
Current cost for item #41291-0VGA "LARGE CAPACITY HAND RIVETER" is $16.99
+ shipping.
Harborfreight also sells item #33172-4VGA "HEAVY DUTY HAND RIVET TOOL"
but this rivet gun is too small and is incompatible with the 1/4" rivets
required to hold the window regulator to the door shell
Local GM Dealer
1/4" peel rivets
Power window switches
New window regulators list for around $150/each but the regulators
are bare and do not include the motor
Salvage yards, swap meets, online classifieds, ebay auctions
Window regulator assemblies
Electrical connectors for window motor and switches
Local Auto Parts Store
Friction clips to retain door panel to the door shell
New window motors list for around $50/each at most autoparts stores.
Remanufactured ones cost a little less, but are not as reliable.
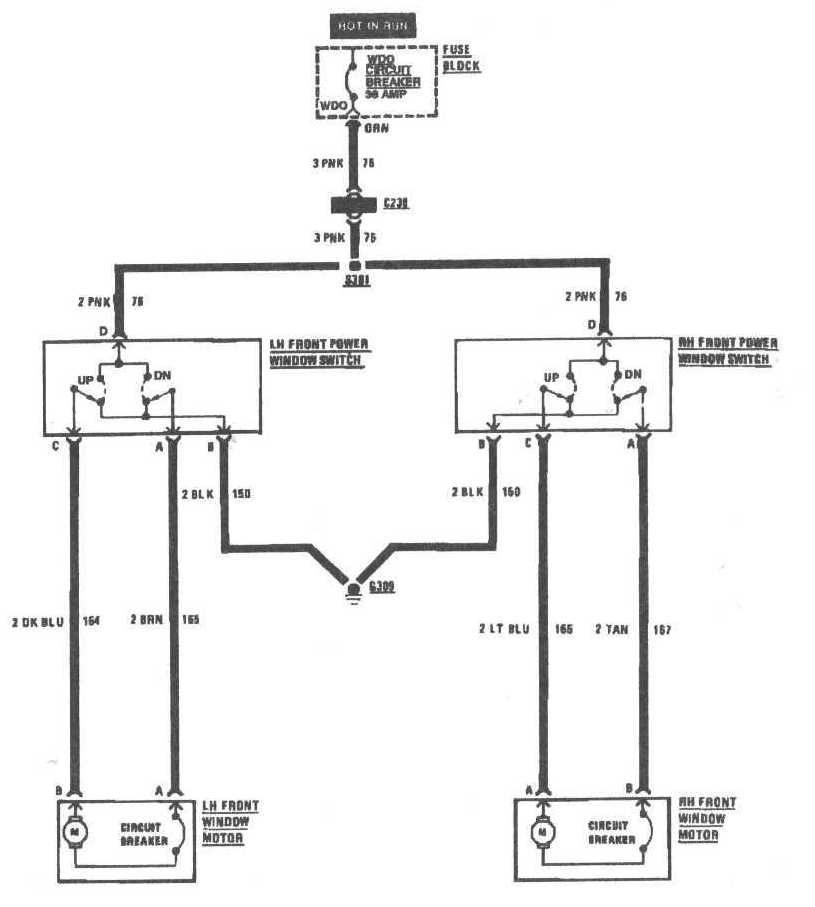
Electrical Connections:
As can be seen by the diagrams below, the power window circuit gets power from the thick orange wire on the ignition switch harness, which then runs through a 35 amp circuit breaker located on the main fuseblock under the drivers side dash.
To get power for the electric window retrofit project, splice one wire of a standalone fuse holder to the thick orange wire on the back of the fuse block. Splice the other side of the fuseholder to the pink wire that connects to the power window switches located in the center console. A 30amp fuse installed in the fuse holder should be sufficent. (power for other optional accessories is also supplied through the "WDO" circuit breaker, so the windows actually use less than 35amps at peak).
Back of fuseblock is not difficult to access, first remove the underdash panel and then remove the two screws that hold the fuse holder to the dashboard.
From the factory, a good portion of the power window wiring is inside a plastic conduit that is attached to the metal underneath the front windsheild. To access this wire, the dash pad has to be removed. But for the power window retrofit project, there is no requirement that the wire run through this difficult to access location.
For ease of installing the wiring that runs to the power window switches, it will be necessary to remove the radio and center console from the car. To secure the new wiring in place, i wrapped electrical tape around the gear selector wires and the new power window switch wires.
Note: Power window circuit only receives power when the key is in the
"run" position, it does not receive power if the key is turned backwards
to the "accessory" position. If one wants the windows to be always functional
regardless of key position, tap the red wire on the ignition switch harness
for power. Due to federal vehicle safety standards (FMVSS), general motors
was not allowed to have the windows powered without a key in the ignition.
(Click on either wiring diagram below to view a larger version.)

Switch Installation:
[Picture of center console with window switches mounted]
[Physical measurements of switch location in relation to console plate]
[As an alternative to cutting the current center console cover, one
could instead acquire a used salvage yard center console cover plate from
a power window equipped thirdgen.]
Window Crank Removal:
![[PICTURE OF SPECIAL WINDOW CRANK REMOVAL TOOL]](windowcranktool.jpg)
above is the special tool to remove the clip from the window crank handle
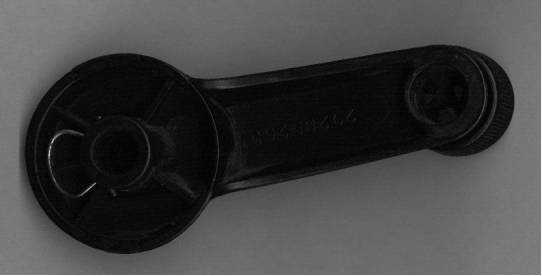
above is pictured the window crank clip and the window crank. if the special
tool is unavaliable, a small screwdriver can be used to carefully slide
the clip off the handle. once the clip is off the handle, the crank will
slide off the regulator shaft.
Regulator Swap:
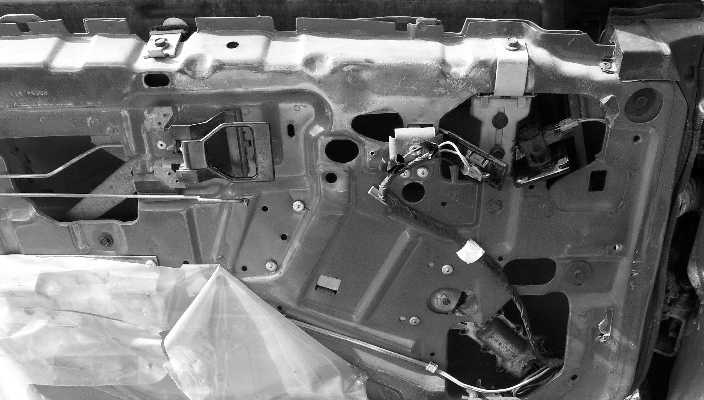
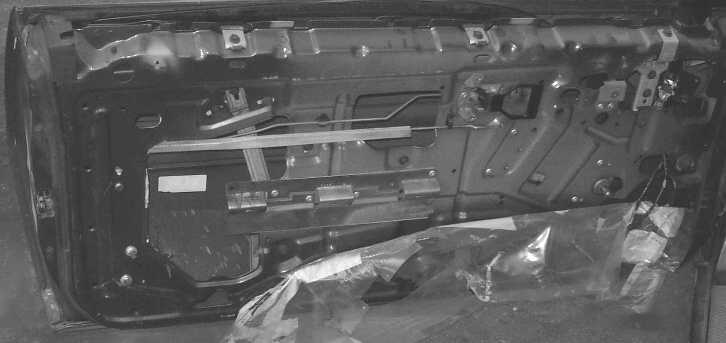
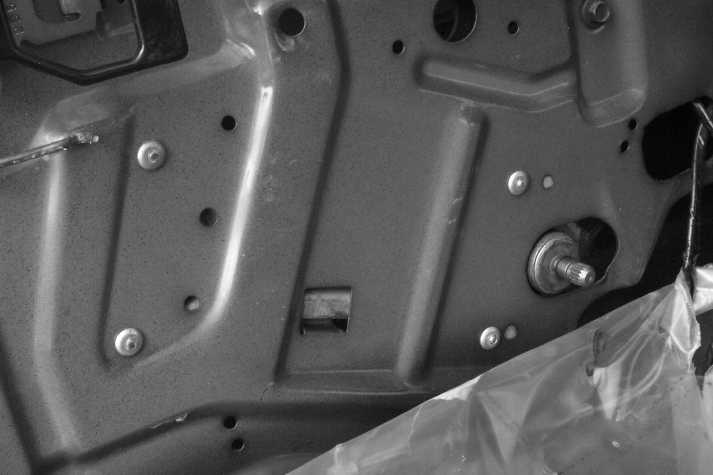
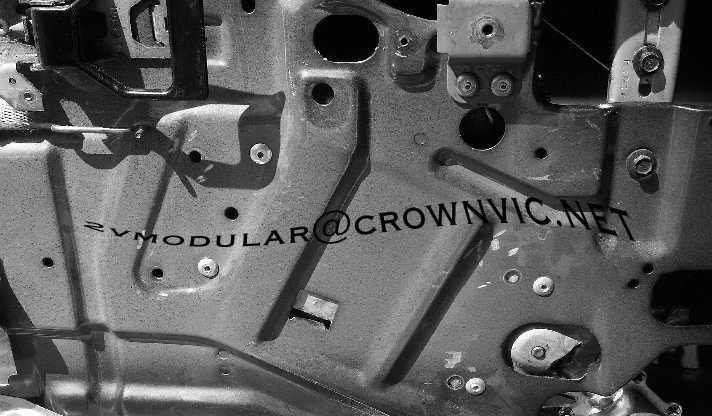
After removing the manual crank handle, i removed the door panel and the plastic weather barrier to access the door internals. Note: The door pictured below is from a late 1980's thirdgen. Depending on the model year of your f-body, the door may have a different appearance to some of the internal components. But despite the appearance differences, the only part that will need to be changed is the regulator.
Before attempting to remove the current regulator, roll the window down as low as it will go. It is not desirable for the window glass to come crashing down and shatter when the regulator is removed from the door.
There are four 1/4 inch aluminum "peel" rivets on each door that hold
the regulator to the door shell. To remove the rivets, I:
Note: Regulator rivets can be time consuming and frustrating to remove
without damaging the door. But since the current door shell will be reused,
do not attempt to "brute force" the regulator out of the door using crude
implements such as prybars, cutting torches, 10 guage shotguns, etc.
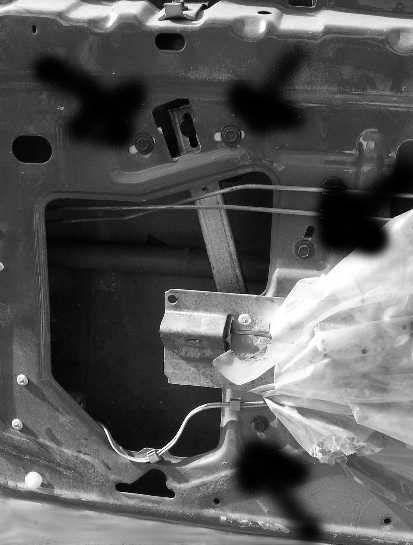
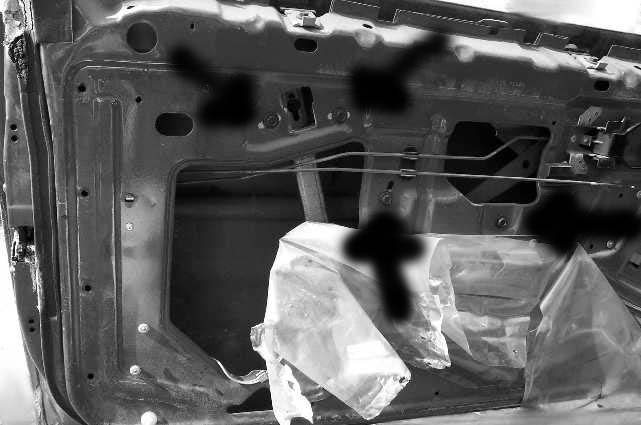
After rivets securing the regulator to the door were removed, i marked where the bolts were located and unbolted the 3 bolts that held the rear window glass channel to the door shell and removed the track, i similarly marked and also removed the 2 retaining bolts for the L shaped track that one of the regulator wheels slid in.
Old manual regulator could now be removed from the inside of the door and new power regulator installed in it's place. Next step was to rivet the power regulator to the door shell using 4 new 1/4" rivets. It will be unlikely that the holes in the door shell will line up exactly with the 4 holes in the power window regulator, so you'll need to connect a power source to the regulator to get it to move.
In the picture above, a power regulator is mounted in the door. In the one below, a manual regulator is mounted in the door. Note how the power regulator uses the set of 4 holes a little bit to the right of where the manual regulator mounts.
Do not confuse the drivers side and passengers side regulators, they look very similar but each is unique. During the swap, I somehow managed to confuse the two and had symptoms of the window only having a travel range from the fully rolled up position to a few inches below the fully rolled up position. Window would not even come close to being fully open.
After inserting the new power regulator inside the door, i proceded to put two of the regulator "wheels" onto the "channel" rivetted to the window glass. I then reinstalled both tracks that i removed prior to regulator removal, and put the bolts back in place.
Shouldn't need to handle the door internals much anymore, so grease the tracks with some white lithium grease.
Now comes time to test the window and make sure that it moves smoothly and that it fully opens and closes.
If all is well, move on to the next door.
After you're confident that both windows operate properly, reattach the weather barrier to the door shell (duct tape will work if it's torn). Then place the door panels back on the door.
Other thoughts and issues:
there will be a circular hole left in the door panel where the window
crank used to mount. could reupholster the door panel to correct, could
also use various body plugs to fill it. sometimes, you'll get lucky and
the circular cutout of upholstery is still hanging off the door panel and
can be glued back into place. FastElectrics ([email protected]) found
that a tweeter for the stereo system will fill the hole nicely too.
Each time the door opens and closes the wires that run from the body
of the car to the electric components inside the door flex. After a while,
the metal conductors of the wire fatigue and break. If enough conductors
inside the plastic jacket of the wire fail, the wire will not reliabily
conduct electricity anymore but may look fine at a quick glance. If installing
a used window harness, it may be desirable to replace the portion of the wire
that flexes as a precaution.
Directed electronics (DEI) makes the 530T "one touch" window module that will automate windows rolling up and down. just quickly tap the down button and release and the window will roll fully down, the up button behaves in a similar manner. I installed one of these modules when i did the power window conversion project. Is a very convienent feature that's great for tollbooths and drive-thrus.
Are universal power window conversion kits avaliable that grip where the splines from the window crank would normally go and will use an electric motor to drive the original manual window regulator. idea sounds good in theory, and the installer saves time because the original regulator does not need to be removed. If one has the local car stereo/alarm shop convert a crank window car to a power window car, this is probably the solution that would be used. be warned, that these universal conversion kits are troublesome when the teeth that go over the regulator crank strip out (they often due within a year or two). are a couple big names in the universal conversion kits: spal and colobri. However, if you plan on keeping the car for a while, it's probably best for reliability reasons to change out the entire regulator assembly for a power one.
If acquiring used salvage yard parts, watch for whitish corrosion on electrical terminals. This means that the parts have been in an unsealed door and exposed to the weather for extended periods. One can sand off the corrosion and have the parts conduct electricity for a while, but corrosion will likely appear again within a short period of time.
Should bench do a basic bench test on the power window motors before installing them. If the car is already wired for power windows, just plug the motors in and press power window switch. If car is not wired, pop the hood of your vehicle and connect one terminal of the motor to ground and the other to the positive terminal.
Even if the motor moves smoothly during the test, probably should also consider checking the condition of the brushes. To check, pop off the white plastic end cap by first bending out metal tabs (careful not to loose the brushes as they are spring loaded), inspect the brushes for wear, if questionable replace. Then remove the armature assembly, place armature in the end cap with brushes pressing against the commuatator and reinsert inside motor housing and rebend tabs.
If the motor turns out to be faulty, a replacement is around $50 new at most independent parts stores. Make sure to securely attach the sector gear to the backing plate if removing the motor as the counterweight spring can have a significant amount of tension. Definetly wear safety glasses during motor replacement.
Power windows move much quicker and smoother when the tracks are greased
with white lithium grease. If not greased sufficently, the power windows
may refuse to move and instead stop repeatedly when the thermal circuit
breaker engages.
The most common complaints about manual crank windows are:
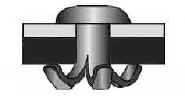
Are multiple types of rivets. With the regular hardware store variety rivet, the end bows a little bit when inserted. With a "peel rivet", the end splits and provides a greater surface contact area to better distribute the forces of the window regulator.
Regulator assemblies are thirdgen f-body specific and will not interchange
with other general motors products. Even though the regulators may look
similar, does not mean they will interchange. On the otherhand, many general
motors products share the same window motors:
92-82 Camaro
91-82 Blazer Full Size
91-82 C 10/30 Pickup (also fits rear door)
91-85 Calais (also fits rear door)
90-80 Caprice (also fits rear door)
91-80 Catalina (also fits rear door)
00-82 Cavalier (also fits rear door)
90-79 Celebrity (also fits rear door)
97-80 Skylark (also fits rear door)
96-85 Somerset (also fits rear door)
91-82 Suburban (also fits rear door)
96-82 Sunbird (also fits rear door)
00-82 Sunfire (also fits rear door)
96-85 Tempest (also fits rear door)
81-79 Tempest
92-79 Toronado
92-88 Trofeo
91-82 V 15/35 Pick_up (also fits rear door)
96-79 Century (also fits rear door)
88-82 Cimarron (also fits rear door)
85-80 Citation (also fits rear door)
92-80 Custom Cruiser (also fits rear door)
88-79 Cutlass
96-82 Cutlass Ciera (also fits rear door)
88-79 Cutlass Supreme
92-80 De Ville (also fits rear door)
91-80 Delta 88 (also fits rear door)
88-79 El Camino (also fits rear door)
91-79 Eldorado (also fits rear door)
90-80 Electra (also fits rear door)
90-80 Estate Wagon (also fits rear door)
88-84 Fiero
92-82 Firebird
88-82 Firenza (also fits rear door)
92-80 Fleetwood (also fits rear door)
95-81 G 1500/3500 Van
99-85 Grand Am (also fits rear door)
81-79 Grand Am
87-79 Grand Prix
90-80 Impala (also fits rear door)
96-82 J2000(also fits rear door)
91-82 Jimmy
91-87 K 10/30 Pick_up (also fits rear door)
86-82 K 10/30 Pick_up (also fits rear door)
96-88 Le Mans (also fits rear door)
81-79 Le Mans
91-80 Lesabre (also fits rear door)
83-79 Malibu (also fits rear door)
88-79 Monte Carlo
85-80 Omega (also fits rear door)
87-83 Parisienne
90-80 Park Avenue (also fits rear door)
85-80 Phoenix (also fits rear door)
91-82 R 15/35 Pickup (also fits rear door)
93-88 Reatta
87-79 Regal
93-79 Riviera
94-82 S10 Blazer (also fits rear door)
93-82 S10 Pickup
94-83 S15 Jimmy (also fits rear door)
93-82 S15 Sonoma Pickup
92-91 S15 Syclone
93-92 S15 Typhoon
89-87 Safari (also fits rear door)
91-80 Seville (also fits rear door)
89-80 Skyhawk (also fits rear door)
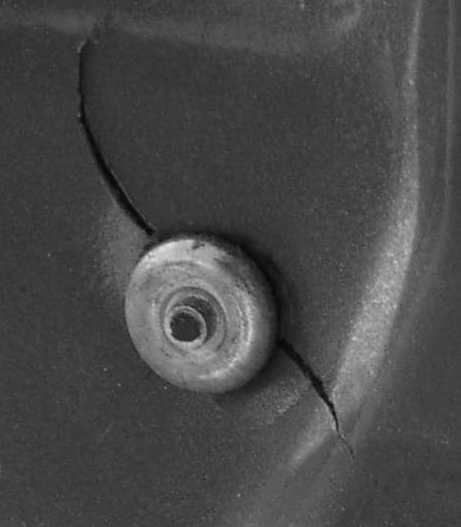
Not really part of the power window swap project, but here's an odd problem that sometimes happens to thirdgens that are factory equipped with power windows. The metal door shell metal flexes a little bit each time the window closes and opens. After a while the metal around where the regulator mounts cracks. (Note: On this particular car, both doors were cracked.):